The six steps
How the Sandbox studio is laid out: the three ways to start a project, the eight starting maps, then Map, Cast, Build, Rules, Test and Publish — what each step is for and when to skip ahead.
The studio has one path through it, and it is always the same: Map → Cast → Build → Rules → Test → Publish. Six steps in the top bar, a Next button to move along, and nothing else to learn. This page describes the path; the studio tour describes the panels.
Getting in
With no project open, /studio offers three ways to start, as three cards. Pick one: the project is created, saved to this browser right away, and you land on the Map step.
| Way in | What you get | When to pick it |
|---|---|---|
| Start from a game | One of the nine games (race, platformer, arena, runner, explore, capture the flag, tower defense, hunt, cove), complete and playable the moment it opens: terrain, characters, objectives, rules. | To learn by playing, and to take apart a game that already works. |
| Start from a map | One of the eight starting maps, picked from a real top-down thumbnail, then a game mode. You land in a world that has terrain, a sky and its water — and no gameplay at all. | When you know what your world should look like, but not yet what happens in it. |
| Empty project | A mode, flat 40×40 ground (a 16×100 corridor in runner), a player start and eleven starter assets. The blank page. | When you build everything yourself, or for a bare prototype. |
Below the three cards sit the projects already saved in this browser (open, delete) and the Import button that reopens an exported .sandbox.json.
The eight starting maps
A starting map lays down terrain, a sky, an hour, sometimes water or weather, and a matching render style. It places no objective: the mode you pick right after decides what is played on it.
| Map | What it looks like | Suits |
|---|---|---|
| Flat ground | 48×48 of flat ground, low poly, broad daylight. Nothing else. | Anything that wants neutral ground: puzzles, home-made arenas, tests. |
| Island | 56×56: round hills, a beach all around, the sea beyond, afternoon light. | Explore, treasure hunts, a small self-contained adventure. |
| Valley | 64×48: soft hills and a winding river, morning light. | Explore, hunting, outdoor platforming. |
| Canyon | 64×48: stone cliffs stepping up around a sand corridor, sunset, realistic render and a warm grade. | Race, runner, chase: anything that follows a corridor. |
| Arena | 44×44: a flat tiled disc ringed by a wall, late day, bloom and a cool grade. | Arena, capture the flag, duels and sports. |
| Archipelago | 72×72: islets scattered on a high sea, the largest of the maps. | Island hopping, flying and swimming, far-apart bases. |
| Tundra | 60×60: snowed-over relief, overcast sky, thick mist and falling snow. | Hunting, survival, cold and quiet moods. |
| Void | 32×32: a pale platform suspended in the dark, toon render, bloom and vignette. | Parkour, abstract platforming, minimal levels. |
/studio?map=island&mode=explore opens the same combination directly.The six steps
| Step | The question it answers | What it holds |
|---|---|---|
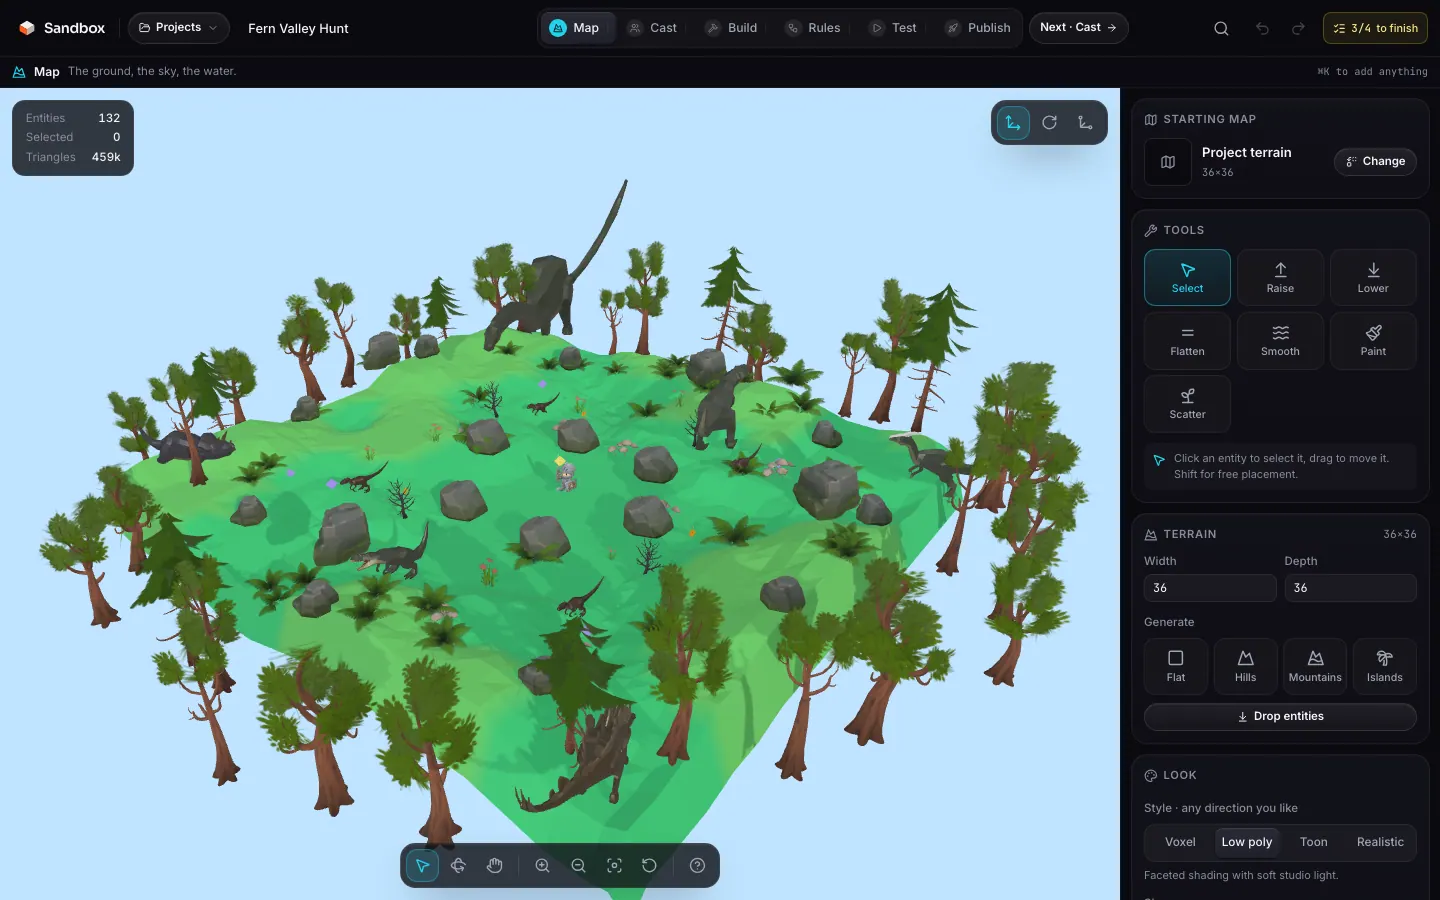
| 1 · Map | What does the world look like? | Starting map, terrain sculpting and painting, size, sky, hour, weather, water, post-processing, music. |
| 2 · Cast | Who acts in it? | The player, the enemies, the NPCs, the spawners — each with its model, its copies and its settings. |
| 3 · Build | What is around them? | Library, asset editor, placing, scattering, gizmos, outliner, inspector. |
| 4 · Rules | How do you win? | Game mode and its settings, When / If / Then rules, variables, HUD, scripts. |
| 5 · Test | Is it any fun? | The game in the players’ runtime, with Restart. |
| 6 · Publish | Is it ready to go out? | Listing, cover, what’s missing, publishing and exports. |
1 · Map
The map is the ground, the sky and the water. At the top of the panel sits the project’s starting map, with Change to re-apply another one: the terrain and the sky are replaced, the cast and the props stay and settle back on the ground. Below it, the terrain brushes (select, raise, lower, flatten, smooth, paint, scatter) with their radius and palette, the terrain size and generators, then the render style, sky, hour, fog, moods, camera, weather, day / night cycle, water, post-processing and music.
A project that did not come from a starting map — a template, a remix, an import — simply shows “Project terrain” and its size. Nothing is lost: Change is still there.
Terrain and water · Sky and weather · Moods
2 · Cast
Cast is the centre of the studio: everything that moves and lives is decided here. The panel reads as four groups — Player, Enemies, NPCs, Spawners — and every row is one model in one role: its thumbnail, how many copies it has, how many animations it carries, and the settings that matter for that role (behaviour, speed, hit points, team, tag, what an NPC says, a spawner’s rate and maximum). Editing a row edits every copy at once.
| Button | What it does |
|---|---|
| Pick a character | Opens a full-screen browser of the library’s animated characters and creatures (search and filters). The model you pick becomes the player, or lands as an enemy or an NPC, and the map is armed: the next click puts down another one. |
| Model my own | Creates a fresh voxel character and opens the asset editor; on the way back, the model is already armed for placing. |
| Select | Selects every copy in the row inside the 3D view. |
| Place on the map | Arms placing: every click on the ground adds one more copy, in the same role. |
| Edit asset | Opens the model in the asset editor (Model or Animate depending on its kind). |
| Remove every copy | Deletes the whole row. The player cannot be removed, only replaced. |
Entity roles · NPCs and dialogue · Spawners
3 · Build
Build is everything that does not act: trees, crates, coins, checkpoints, flags, signs, turrets. It holds the asset editor’s entry points (+ Voxel, + Build, Import, Edit asset, Animate), the project’s asset list and its starters, the full library, the placement tools (select, place, erase, scatter) with the role picker, the outliner on the left, the gizmos, the entity inspector and the scene stats.
Library · Import · Modelling · Voxel
4 · Rules
Rules answers one question: how you win. The page gathers five sections — Rules (When / If / Then), Variables, Game, HUD and Scripts. The Game section now also carries the mode settings: the mode itself, laps, lives, waves, lanes, the time limit, speed, gravity and jump height.
Rules and events · Variables and HUD · Scripting
5 · Test
Test runs the game in the public runtime, on a copy of the document: playing never changes the project. Restart begins a fresh round from your latest version, and no wallet is asked for here. This is the step you come back to most: test after every change that touches play.
6 · Publish
Publish carries the listing (title, description), the 1280×720 cover captured from the real runtime, the full list of what’s missing, a few numbers about the document, the Publish button and the exports (.sandbox.json, GLB, glTF, OBJ, STL, USDZ).
What’s missing
The chip in the top bar counts four things, and nothing else. Click it: every line still open takes you to the step that fixes it. The same list is open on Publish, and the Publish button stays disabled until it is complete.
| Item | Fixed on | How |
|---|---|---|
| A player start | Cast | Pick a character: it becomes the avatar and the place the game begins. |
| An objective for the mode | Build | Whatever the mode expects (see the table below); in some modes an enemy from the cast is enough. |
| A title | Publish | In the top bar or on the listing. “Untitled” does not count. |
| A cover | Publish | Capture it from the game, or upload a PNG. |
| Mode | Objective expected |
|---|---|
race | A finish line or checkpoints. |
platformer | A finish, or coins to collect. |
arena | An enemy, a spawner or an enemy spawn point. |
runner | Obstacles, hazards or coins down the lanes. |
explore | Coins, signs, NPCs or a key. |
ctf | A flag and a base. |
tower | Waypoints and a base to defend. |
Moving between steps
| Gesture | Effect |
|---|---|
| The Next button | Goes to the next step and names it: “Next · Cast”. |
| A click in the stepper | Goes wherever you want, in any order. A step you have already opened carries a tick. |
| 1 | …to 6: the six steps, in order. Off inside the asset editor, where the digits are the voxel tools, and during a test. |
| ⌘K | Opens quick add: search the whole library and the starters, Enter adds the asset and arms the map. |
| Esc | Closes the asset editor and returns to the step it was opened from. |
The asset editor is not a step
When to skip ahead
The order is a strong suggestion, not a rule: nothing is locked, and a game is rarely finished in one pass.
| If you start from… | Do this instead |
|---|---|
| a complete game | Go straight to Test and play it, then to Cast to swap in your own characters. Map and Rules come after. |
| a starting map | The map is already done: move on to Cast, put down a player and two enemies, test, and only then come back to sculpt. |
| an empty project | Follow the order. It is the one case where the six steps really do read left to right. |
| a remix | Test first, to understand the game you are taking over; then whichever step holds the thing you want to change. |